Wednesday, December 20, 2017

Merry Little Christmas Card w/Ranger Ink...

Hi everyone, thanks so much for stopping by today!  I have a guest tutorial post to share with you over on the Ranger Ink blog.  I'll show you step-by-step how I created this fun Merry Little Christmas Card!  I hope you'll pop on over and take a peek!


Stop back by soon.  I really appreciate your kind comments and I hope you have a Merry Christmas and Happy New Year! xx

Bobbi

I've listed the products below, used to create this project.  I am part of various affiliate programs including Simon Says Stamp.  When you click on an affiliate link and make a purchase (at no extra cost to you), I receive a small commission.  Thank you, I genuinely appreciate your support!

Saturday, December 16, 2017

Great Outdoors Merry Christmas Card...

Hello friends!  Are you ready for Christmas…do you still need a few last minute cards?  I'm sharing a fun, quick and easy Christmas card today.  Let me walk you thru how I put it together.
 I had stamped the images with my Simon Says Stamp-Tim Holtz Stamptember stamp set.  Unfortunately, I believe it is sold out. 
A great alternative would be the Tim Holtz Stampers Anonymous Great Outdoors CMS321 stamp set.  The deer, tree and sentiment images are identical, just slightly different scale.


I colored the sky with Faded Jeans and Chipped Sapphire Distress Ink and a blending tool.  I selected a handful of brown and green Distress Inks to stamp the deer and trees using my Stamping Platform.   I assembled the card to kraft card base, layered with red cardstock, then the stamped distressed watercolor cardstock.  Then tied off a small craft thread bow to sentiment banner.
I hope you'll give it a try!  If you have any questions please let me know I love your comments, I truly appreciate each and everyone of them!  As always thanks for stopping by and I'll see you next time!  xx

Bobbi

I've listed the products below, used to create this project.  I am part of various affiliate programs including Simon Says Stamp.  When you click on an affiliate link and make a purchase (at no extra cost to you), I receive a small commission.  Thank you, I genuinely appreciate your support!

Monday, December 4, 2017

Home for the Holidays...

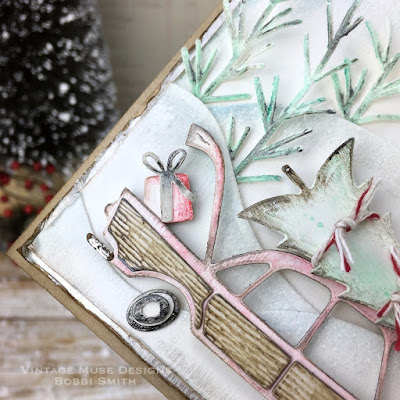
Hello friends!  I'm back today sharing my last project that I created for the Tim Holtz Holiday Inspiration Series.  This Christmas Card was created using the new "Home for the Holidays" Tim Holtz Sizzix Seasonal dies.  When I was dreaming up this card, I thought it would be fun to use a mint green, pink and red color palette.  Let me walk you through how I put it together.
To start with, I painted a thin layer of white gesso on 3 sheets of Distress Mixed Media Heavystock.  Then applied a coat of Distress Collage Medium Matte to the gessoed Heavystock and a sheet of Distress Woodgrain Cardstock, let air dry.  This will allow the Distress Crayons to glide over the cardstock and blend well.  I die cut all the paper pieces from the gessoed Heavystock.
The car wood panels were die cut from the Distress Woodgrain Cardstock.
I applied various colors of Distress Crayons to all cutouts to achieve color and shading.
I used Metallic Distress Crayons and Distress Rock Candy Dry Glitter to add a bit of shimmer and sparkle.  It's hard to translate thru the photos but, in person it creates a beautiful sparkle and shimmer!
I assembled the card to kraft card base and layered mat with silver Metallic Kraft Cardstock.  I tied the Christmas tree to the top of the car with a little red and white twine.
I hope you'll give it a try!  If you have any questions please let me know I love your comments, I truly appreciate each and everyone of them!  As always thanks for stopping by and I'll see you next time!  xx

Bobbi

I've listed the products below, used to create this project.  I am part of various affiliate programs including Simon Says Stamp.  When you click on an affiliate link and make a purchase thru that link (at no extra cost to you), I receive a small commission.  Thank you, I genuinely appreciate your support!