Sunday, May 31, 2015

Be Authentic Burlap Panel

 Hello friends!  Today I'm sharing a mini burlap panel, that was fun and easy to do!  I think this would make the cutest addition to a small wall collage or even a gift basket!
 For the background I smeared some Transparent Gloss Texture Paste on to the burlap panel.  While the paste is still wet, I generously sprinkled Clear Rock Candy Distress Dry Glitter onto surface, then shook off excess.(The Tim Holtz Mini Burlap Panel is no longer avaiable,
so I have added some substitutions in the product list at bottom of post)
 I set aside the burlap panel to air dry.
 It's hard to see in the photo, but you get a great sparkle from the Distress Glitter yet it's transparent that you can still see that burlap panel.
 I colored the watercolor cardstock with Mermaid Lagoon, Peacock Feathers and Cracked Pistachio Distress Spray Stain and a little water.  Then dried with a heat tool.
 I die cut the watercolor cardstock with the lattice die from the Mixed-Media Thinlit set.
 Then I trimmed it down to fit nicely on top of the burlap panel.
 I diecut one of the butterflies from the butterfly duo die with watercolor cardstock.  Then I colored with Mustard Seed and just a little Spiced Marmalade Distress Spray Stain, then dried with a heat tool.  I intensified the color slightly in center of butterfly with Mustard Seed Distress Ink and a blending tool.(The Sizzix Tim Holtz Butterfly Duo is no longer available, so I have added some substitutions in the product list at bottom of post)
 I ran the butterfly through the vagabond using the Butterfly Duo Texture Fade that accompanied the die. (ignore the blue butterfly, it was originally blue not yellow)
 I highlighted wings with Spiced Marmalade.  Then did some outer shading with Walnut Stain Distress Ink and a blending tool.  I attached the diecut lattice to the burlap panel with foam squares. Then I attached the butterfly to the lattice with foam squares as well.  Then finished off with one of the black Small Talk stickers and a Special Delivery Remnant Rub.  Quick and super easy :)
Thanks so much for the visit.  I really appreciate it, have a wonderful day!  xx

Bobbi

I've listed the products below, used to create these projects.  I'm part of various affiliate programs including Simon Says Stamp.  When you click on an icon affiliate link and make a purchase thru that link (at no extra cost to you), I receive a small commission.  Thank you, I genuinely appreciate your support!


Saturday, May 30, 2015

12 Tags of 2015 {My May Version}

Hello, my blogging friends!  Today I'd like to share my May version of Tim Holtz's 12 Tags of 2015.  Tim Holtz has a wonderful tutorial on his blog with step-by-step instructions on how to create this fun technique here.  I followed Tim's instruction, but I didn't have the fun new tiny tattered floral die set, so I used the pinecone die to make my roses.
 For my larger ephemera pieces, they are actually two of the smallest cards in the pocket cards set.  There are so many possibilities with these fun idea-ology pocket cards...there's a hundred cards in a pack!
I hope you have enjoyed my version of Tim's May tag, I always have so much fun making them.  You can find most of the supplies I used at Inspiration Emporium via the links below. Remember to use my coupon code - vintagemuse - to save 10% on your order.  I also want to remind you that Inspiration Journal is having a fun "Pasted" challenge here, so hop on over and upload your fun project for a chance to win, you have until May 31st.  One lucky winner will receive a very generous $50 gift voucher to spend at Inspiration Emporium!  If you have any questions or if there's anything I missed please let me know I love your comments, I truly appreciate each and everyone of them!  As always thanks for stopping by and I'll see you next time!  xx


Monday, May 25, 2015

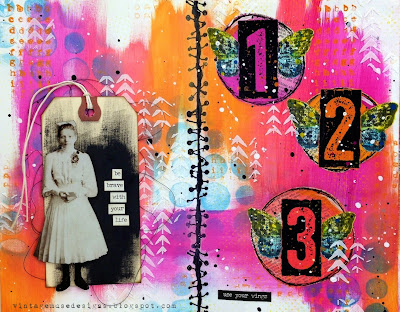
Use Your Wings Art Journal

Hello friends!  Today I'm sharing an art journal layout, that I did for Inspiration Emporiums "Pasted" Challenge!  I try to keep my pages pretty flat in my art journal and Embossing Paste is the perfect addition for adding dimension and texture, without too much height.  I love spending time in my art journal it's always so relaxing!
I'm using the Dylusions Small Creative Journal.
  First thing I did was add an even layer of white gesso to both pages of my art journal spread.  Then, I started by laying down three colors of Distress Paint in my journal.  Abandon Coral, Picked Raspberry and Spiced Marmalade, I really had no rhyme or reason in the application other than trying to keep as much of my brushstroke visible as possible.  Then dried with a heat tool.  I hand cut three circles from vintage dictionary paper and adhered with Ranger Multi Medium.  I partially covered the circles with a light wash of distress paint in same colors and dried with heat tool.
 Then gave another light coat of Ranger Multi Medium to seal the surface of the circles that had no paint covering them.
 I added some irregular circles with the "Splotches" stencil and Mermaid Lagoon Distress Paint.  I applied the paint using a dry blending foam picking up the paint ensuring that the sponge was very dry with little color so it didn't seep under the stencil.  After waiting a few minutes for the color to dry I went back with a baby wipe and lightly lifted some excess color for a more translucent look, then dried with a heat tool.


 I created the numbers by painting an even layer of color on deli paper using Picked Raspberry, Spiced Marmalade and Abandon Coral Distress Paint.  I tried thoroughly with a heat tool.  Using the Number Block Stamp I applied an even layer of Black Soot Distress Paint and stamped onto the dried deli paper.   Clean your stamps immediately, you do not want the Distress Paint to dry on there, as it will become very hard to get off.
 I stamped the Watercolor Butterfly with Watering Can Archival Ink onto some vintage mathematical tables paper.  I brushed an even layer of Ranger Multi Medium over the stamped butterflies and dried with a heat tool.  Then I color of the butterflies with a watered-down wash of Mustard Seed and Mermaid Lagoon Distress Paint, then dried with a heat tool.
I flicked some splotches of same color to butterflies with loaded paint brush then dried with heat tool.  I cut out 3 butterflies and split the wings down the center.

I attached the numbers and wings to vintage dictionary circles on left hand side of the page using Ranger Multi Medium.  I also stamped some random alphabet with Spiced Marmalade in various places on the pages.

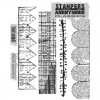
I stamped the stitching stamp on deli paper using Jet Black Archival Ink and dried with a heat tool.  I cut out the stamped stitching and adhered it to the center of the journal using Ranger Multi Medium, then dried with a heat tool.
 To add a little more interest to the page I flicked some Black Soot Distress Paint watered down onto the journal and dried with a heat tool.
I did the same with some watered down gesso also.
I outlined the large circles with a black Ranger Fude Ball Pen, when dry it's waterproof and fade proof.
 I added texture paste using the "Tracks" stencil in random places on both pages and let air dry.
 I added a #5 manila tag that I had smeared a little Black Soot Distress Paint on and cut out one of the girls from the Found Relative card pack.  The wording on both pages is from the Small Talk Stickers.
Remember to enter your "Pasted" (embossing paste) themed projects over at Inspiration Journal and one lucky winner will be given a very generous $50 gift credit, to spend at Inspiration Emporium.  You can find most of the supplies I used at Inspiration Emporium via the links below.  Remember to use my coupon code - vintagemuse - to save 10% on your order.  I hope you enjoyed my Art Journal layout!   If you have any questions or if there's anything I missed please let me know I love your comments, I appreciate each and everyone of them!  As always thanks for stopping by and I'll see you next time!